 I can always find all sorts of excuses as to why it is necessary to either take a break from a large project or start new ones. For all knitting there is a season, be it Christmas time, approaching birthdays, pregnancies, kids who are smaller than adults and therefore their stuff knits up quicker, or dorky whims/free patterns found all over the internet (knitted vegetables for example). I bought this kit from Ram Wools and began knitting it on the day my niece was born. Now I'll totally embarrass myself by telling you that this infamous day was almost *ahem* SIX YEARS ago. I have urgently felt the need to pick up those occupied needles and resume work on this jacket because it will be bee-YEW-tiful when it is finished and I want to wear it this season. I have done some marathon knitting over the past 2 days and finished the back panel and pocket linings! Later today when I wake up, I will begin the right front panel. This sweater is bordered by 6 rows of red in plain garter stitch which is knit on size 4 needles while the fair isle portion is knit on size 6. I can't find my size 4 circular needles (no doubt they are occupied somewhere by some other partially worked project!!) and I avoid using my LONG straight needles as much as possible. I was digging thru my needle arsenal earlier and to my utter delight, I found these! They are the same size and I will get to use them for the first time! I bought these at a dollar type store in Germany last year on my trip! I bought 4 pairs in different sizes and these were my ONLY knitting souvenirs from that trip. We had traveled on a group tour and were only in shopping/non-tourist areas during funny hours of the day or on weekends so EVERY single fiber/yarn shop I had on my list was closed by the time we got there. I was happy to come away with these needles though and I'm excited to christen them tomorrow!
Tuesday, August 21, 2007
Toni Jacket Revisited
I can always find all sorts of excuses as to why it is necessary to either take a break from a large project or start new ones. For all knitting there is a season, be it Christmas time, approaching birthdays, pregnancies, kids who are smaller than adults and therefore their stuff knits up quicker, or dorky whims/free patterns found all over the internet (knitted vegetables for example). I bought this kit from Ram Wools and began knitting it on the day my niece was born. Now I'll totally embarrass myself by telling you that this infamous day was almost *ahem* SIX YEARS ago. I have urgently felt the need to pick up those occupied needles and resume work on this jacket because it will be bee-YEW-tiful when it is finished and I want to wear it this season. I have done some marathon knitting over the past 2 days and finished the back panel and pocket linings! Later today when I wake up, I will begin the right front panel. This sweater is bordered by 6 rows of red in plain garter stitch which is knit on size 4 needles while the fair isle portion is knit on size 6. I can't find my size 4 circular needles (no doubt they are occupied somewhere by some other partially worked project!!) and I avoid using my LONG straight needles as much as possible. I was digging thru my needle arsenal earlier and to my utter delight, I found these! They are the same size and I will get to use them for the first time! I bought these at a dollar type store in Germany last year on my trip! I bought 4 pairs in different sizes and these were my ONLY knitting souvenirs from that trip. We had traveled on a group tour and were only in shopping/non-tourist areas during funny hours of the day or on weekends so EVERY single fiber/yarn shop I had on my list was closed by the time we got there. I was happy to come away with these needles though and I'm excited to christen them tomorrow!Gold Rush Days!

Gold Rush Days were held in Rochester this weekend and we all converged as a family on my sister and her husband's home, including my dear friend Melissa. You never know what you are going to find there, but this year was marred by the RAIN! It rained constantly all day and you just could not be outdoors so it was very crowded to say the least. Melissa and I must be really slow too because we hadn't even gotten through two buildings before the rest of the family was calling on the cell phone ready to go home for the day. Pictured here are some lovely vintage beads cut from old clothes. This same vendor had trims, appliques, laces, etc. which were gorgeous but too expensive for me. These beads are sitting on a charming tea towel that my sister in law picked up for me on a recent trip to Alabama. I just love it and I'm trying to decide if I want to use it as a towel, or sew it into something. Decisions, decisions. The beads will be bead knitted into SOMETHING but I don't yet know what.

These are 2 FABULOUS Pyrex bowls I also picked up! I absolutely LOVE them! The smaller lidded one was $9.50 and the larger one without a lid was $8.50. I also snapped up a very Martha-esque painted wooden handled slotted spoon for $12.50. My mother has a similar spatula at home and I can't believe how STURDY they are even after all these years. These are shown on my newly acquired French dreaming fabric from SupperBuzzy! Now what to do with THAT?!


I also picked up a new collection of fairy tales called "The Tenggren Tell-It-Again Book" illustrated by Gustaf Tenggren. I absolutely love fairy tales and nursery rhymes and the illustrations seemed familiar, particularly Hansel and Gretel. I wonder if we didn't have one of his books growing up. These were my two favorite pictures from the book. Can you guess why?

And finally what I could not afford: these glorious heddles! I should have taken a business card from these dealers because I've seen them every year that I've been to Nordicfest too. They specialize in Scandinavian pieces. You'd think they'd just held up a museum when in fact they actually sell items to museums. I don't know WHERE they find these pieces, but they are simply devine. None of these heddles were under $500. My other favorites of theirs were some woven pieces, bunad jewelery, boat shuttles, and bridal crowns. Absolutely beautiful!
Thursday, August 16, 2007
Just in case...


My friend DeeDee and her mother are big into the local farmers' markets and travel all over selling their produce. They have both been very encouraging when it comes to promoting things I make. I am never organized enough to have any sort of project inventory ready when local craft fairs and the like are in full swing, but I had the idea to whip up a few Avoskas to sell in their stall. An Avoska is a Russian string bag so named because a Soviet comedian once called it such in his routine and the name stuck. Avoska literally means "just in case" in Russian and they're commonly carried in case an opportunity to buy consumer goods arises and you have something to carry it home in. These were knit on US size 15 circular needles with a worsted weight 100% cotton (think dishcloths) yarn in a simple eyelet pattern. They stretch out nicely and will hold a lot. I remember we had a navy blue one growing up and we'd carry our towels and swimming suits to the babysitter's house in it. So far there has been interest in them but no takers. The yarn costs $3 for each bag and they take 2-3 hours to knit. I'm asking $15 for each one which still doesn't make it worth the time and materials, but we'll see. If they don't sell, my girlfriends and sisters and mother will get a new Avoska!
Sunday, August 05, 2007
There's just something about whipping eggwhites til glossy...


We had a slumber party at Brenda's house last night. Yes indeed, a slumber party. Melissa and I stayed over and our friends Zak and Summer made an appearance. Brenda made a batch of fabulous barbeque meatballs and twice baked potatoes. DeeDee couldn't make it but we had sweet corn grown by her family. I baked french bread, a tomato tart, and this lemon meringue pie in my favorite Martha Blue antique pie plate. I had a lot of fun playing in the kitchen before the party.
We listened to Sam Cooke half the night and Melissa taught us how to play Train with dominoes. Later we had a few rounds of Idiot during which I layed down some serious smack! Then we had SPA night! We soaked our feet and got them sandal-presentable again, painted our toenails, did exfoliating hand treatments and dead sea salt and clay face masks. I also got a little knitting done. It is always nice to just be together with dear friends! We MUST do this more often! :)

Leftovers
 I finished my wrist warmers from the leftovers of my Army Sock Kit using beads I bought in Thirsk, Yorkshire. These were knit with the same size 2 needles I used to knit the socks. I cast on 35 stitches for each one and when finished, there were only about 6 yards of yarn left! So that worked out well! The beads are from a cute little embroidery shop we found on the way to the James Heriot Centre. They are size 5 beads in shades of smoky purple, blue and green and have white stripes on them like African Christmas beads. I can't wait for cooler weather so I can wear them!
Saturday, July 28, 2007
Army Socks

I finished these this afternoon! I ended up just making a simple pair of ribbed cuff socks on smaller needles to better use this yarn. They were cast on from the other end of the ball of yarn and worked until I started cannibalizing the original oversized sock. I still have the entire cuff of that sock left over and I think I'll try to get a pair of beaded wrist warmers out of it using the same needles. These will be mailed to a dear friend of mine serving in Iraq, hence they are a bit big on my feet. These felt very soft on my feet! :)
Monday, July 23, 2007
"She really saves her candle nubs."
 I remember watching some biography of Queen Elizabeth II and they described her as someone who "really saves her candle nubs," or some such thing. Anyhoo, I am off for just one night and I don't think I have the strength to do any sewing tonight because that will involve taking over the entire kitchen table and surrounding area with the sewing machine and fabric and tools, etc. I work the next three nights and I just finished working the last three so I think I will tidy up a little and just knit tonight. I did get tired of looking at these jars
Friday, July 20, 2007
Mrs. Bunting!


This week is the week of our local county fair and they are holding an open textiles show which they have not done in several years. I asked my sister in law to loan me a few of the things I've knit for my nieces to enter in the show. In a way I feel like I'm cheating by entering something I knit some time ago! As a kid, I always remembered the final week leading up to the fair as a frantic time of finishing projects, preparing, selecting and freezing the choicest baked items, and getting the rabbits looking presentable! This was WAY too relaxed! This is the first ever "garment" that I'd knitted (as in NOT a hat or scarf or mitten). It is a corn cob baby bunting that I bought as a kit from the Lion Brand Yarn company and as I recall, I was trying to get it done before she was born! The "corn" is knit in a bobble stitch and the "husk" is stockinette stitch with slipped stitch ridges. The only thing that I lamented at the time and continue to gripe about is the fact that it is designed for and knit with their Micro-Spun 100% acrylic yarn. Those who know me well know that I can't ABIDE acrylic yarn! Whenever I'm FORCED to use it, I'll always say that I knit whatever it was out of plastic!


My mother gave me the Army Sock Knitting Kit from the Red Cross 2 years ago for Christmas and I've finally gotten around to starting work on them. It is a kit that comes in a lovely vintage-esque tin and includes Army green sock weight yarn, a darning needle, a set of 4 double pointed needles sized US 5 and a reproduced copy of a WWII GI sock pattern that civilians would have knit for the cause. This is the only kit that is offered, but there are other vintage WWII patterns posted on the Red Cross website. The proceeds of each kit go to the Red Cross which is great, but I have to say I'm a bit disappointed in the needles. I started knitting the sock as directed with the included needles, but with the weight of the yarn and the girth of the needles, I thought the stitches were too loose, the junctures laddered too easily, and the overall work was just "holey". I started over again with size US 2 dpn's and cast on 68 stitches instead of the 60 and just used my basic sock formula because I was afraid I wouldn't have enough yarn with the increased number of stitches in the gauge (the original sock pattern calls for a 11" cuff!). The yarn is also simply labeled "100% wool" and that is it! No gauge is listed nor are there any washing/care instructions. It is still a neat little history lesson though. Had I been alive during WWII, I certainly would have knit for the troops. The yarn is VERY soft and these will be very warm.
Sunday, July 08, 2007
O Pioneers!
 Today was the annual pork feed/open house out at the Pioneer Museum here in town. I took along my spinning wheel, my niddy noddy, a few drop spindles, my carders, and some different types of fiber to demonstrate spinning to the public. They were VERY busy which is always nice to see, and there were quite a few kids there too. I visited with a lot of people as they walked through the exhibits and lots of people asked several really good questions. It was nice to talk about the different antique wheels/tools they have there on display because the technology has not changed over the years. I think it was good for the public to see a working wheel vs. an antique/nic nac.
 I roped Summer into coming with me to work on her drop spindle and to knit. Melissa was going to come too but she worked last night and needed to catch up on sleep. I told both of them that NEXT year when they are spinning like the wind, THEY will be in charge of running the wheel and I'll just knit on something! Summer and I were sitting in kind of a neat spot across from a Victorian bedroom set-up and opposite this mirror. I thought it would make such a neat photo to take a picture of our reflection but I couldn't get a clear shot sitting where I was. Oh well. I still think it's a neat picture! You can see Summer holding her drop spindle and kind of make out my wheel in front of our knees.

This afternoon I labored to produce this skein of silk yarn. It is a two ply fingering/sport weight I'd guess (I never did see how many yards I got!) and is very shiny and smooth. This is the last of the silk from my mom's Elizabethan stockings I knit for her. I have a sister who keeps threatening to reproduce so I need to have some nice baby fiber on hand for booties and hats, etc.! I have the skein sitting on my brand new acquisition--a yard of FABULOUS babushka fabric! This is one of those fabrics that you almost hate to make anything with because that would involve cutting it up! Perish the thought!
Thursday, July 05, 2007
Fraggle Socks

These nearly completed socks are for Melissa's husband, Matt. He has recently lost both of his grandmothers in a short span of time and I thought he could use something to keep his feet warm. I really liked this yarn in the yarn shop because of the colors, but I have to admit that I was a bit disappointed by the way they knit up. They are quite busy, to say the very least! I always joke that he will look like he has two dead Muppets on his feet, but then again maybe what that boy needs is to think of Fraggles and frogs every time he looks at his feet. I was so very sorry to hear his news though and I hope he likes them.
Wednesday, July 04, 2007
 Happy Independence Day! I may be working over the Fourth but I will be bringing festive treats both nights! I had some patriotic cupcake papers and flag picks, not to mention a TON of red sugar to use up (it was on sale and I was weak!) so I baked up some more Lemon Bread. I'll dig out my flag scrub and I'll be set for the holiday! Enjoy the day with friends and family and be safe! God bless all our men and women in the armed forces today!
Thursday, June 28, 2007
Tartly

Another favorite souvenir of mine from this trip was a cookbook I bought from the Scottish National Trust. I try to bring back some sort of the food or a cookbook to learn about the food since my mother and I often see a lot of interesting food, but seldom try it. Mother is violently allergic to fish so we are always leery of restaurants, especially when staying on an ISLAND known for it's SEAFOOD! We grocery graze and carry a bag buffet every day unless, of course, we find an Uppercrust!
This cookbook had a recipe for rhubarb tarts and called for puff pastry, rhubarb, and sugar. That's it. And it sounded scrummy and simple. I was home with my parents this week and spent an afternoon making 2 pounds of puff pastry dough for this recipe. The rhubarb part is nothing more than chopped rhubarb coated in sugar and allowed to sweat for at least 30 minutes but no more than 2 hours. I picked nice and red slender stalks and split them lengthwise and into half inch pieces. I really coated them with sugar because I was skeptical that they wouldn't be tart or bitter.

While I had my rhubarb sweating, I got out my puff pastry and cut off a slab, rolled it out to 1/8" thick and used an empty cottage cheese container to cut out rounds. I lined the oven with Mom's long since broken baking stone (but I still use it as an oven liner when I bake bread and pastries) so I'd have a hot and stony surface to bake the pastry on. I assembled the tarts on a sheet of parchment which I transferred to the stone with a cookie sheet. While I was waiting for the oven to get good and hot (425 degrees), I used a bowl to score each round and press a border into the dough. I docked the centers with a fork and then piled the rhubarb on top, trying to stay within the borders.

Now if you have never worked with puff pastry, you have never lived. I use the recipe published May of 2002 in Martha Stewart Living Magazine and have had nothing but exemplary results each time. This recipe uses a full pound of butter and makes 2 pounds of dough that can be frozen up to 3 months. The dough starts as a very light simple pastry with flour, cake flour, 1/2 stick of butter, and ice water. It is almost a light biscuit dough. You chill this dough while you shape your butter. 3 1/2 sticks of butter are beaten between parchment paper until it is malleable and shaped into a 6 x 6" square. Beating it with a pin softens it without warming it. You then remove the dough from the fridge and roll it into a 9" disc. Center the butter package on this disc and mark the straight edges around the butter package with a knife. Remove the butter package and use a rolling pin to roll the edges past the knife markings into a clover shape. Recenter the butter package onto the dough and fold the clover leaves up as you would an envelope. Now carefully and slowly use your rolling pin to press and shape the dough into a 20 x 10" rectangle, keeping the edges as square as possible. Fold the dough up as you would a business letter and wrap in the butter pounding parchment. Chill for 30-60 minutes. Remove the dough from the fridge and again slowly press and shape the dough into a 20 x 10" rectangle and again fold up. Chill as before. Repeat this until you have folded the dough a total of 6 times. You can then use it or freeze it and use it as you do. You can have it longer than 3 months, but after then it will start to oxidize and turn a kind of gray color. It tastes just as wonderful, but it isn't as pretty!
If you do the math, you will find that there are over 1,450 layers of butter and dough! And there is no leavening agent in it: no yeast, no baking powder, no baking soda, no cream of tartar, etc. The steam from the butter as it escapes during baking is what causes the layers to rise and separate into the flaky loveliness that is puff pastry. This is why it is so important that you always put it into a HOT oven so that the rising gets a jump.
Once you have a 2 pound block of this in your freezer, you're set for a while. You just cut a chunk off when you want to make something. You can roll it out and slice it into strips and bake as an appetizer or make cheese straws by doing this after folding in a layer of freshly grated Parmesan cheese. You can make tart shells or flaky crackers or shape, cut, and coat it in sugar and bake until the sugar caramelizes and serve them as a cookie, etc. And for all you dough-heads out there, it is good just to eat it too!
No offense to the good people over at Pepperidge Farms, but I have tried the frozen puff pastry I saw in the store and had finished results that sure looked pretty but they weren't nearly as buttery or flavorful. And the dough wasn't nearly as tasty to just eat either, so I'm afraid I recommend making your own from scratch.

I baked the assembled tarts for about 15 minutes at 425 degrees and the edges puffed right up and contained the rhubarb and the rhubarb got quite juicy. I was just petrified it wouldn't have had enough time to really bake and soften and all I could think of was Celery Pie. This photo really doesn't do them justice! I sprinkled them with a little powdered sugar and whipped some cream with a little powdered sugar. I was very pleased with them. There were a couple tart places, but I think next time I will quite finely dice the rhubarb and let it sweat for at least an hour so it's good and soft when baked. I much prefer a mushy textured rhubarb pie and I like a consistent sweet/tart throughout. This is definitely an early summer recipe too because you need the slender and pretty red stalks. You wouldn't want to make this in August with green and woody rhubarb--that can be disquised in pies with orange juice and red food coloring! What a charming way to showcase rhubarb from the garden!
Monday, June 25, 2007
i like yarn

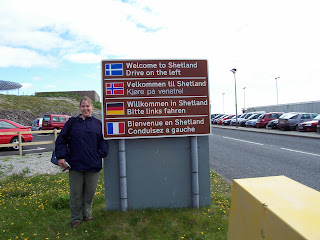
This is a picture of my feet and albino legs as I'm doing the biggest CRUNCH of my life! I finished this pair of socks while we were staying at our guesthouse in Lerwick, Shetland. I wanted to somehow take a picture so you could clearly see I was somewhere foreign. I thought of my feet hanging off some stone walls or on a grand monument or some such thing. Unfortunately I forgot all about it until we had retired to our room for the evening after walking all day. At that point, I was not willing to ambulate further than to the bathroom and back. We did have some lovely chimneys across the street though, and I tried to capture them behind my feet. I'm sure the drivers and pedestrians were wondering what that pair of legs was doing hanging out the window opposite the chiropodists'! These were knit with Trekking yarn on size US 2 dpn's with a cuff of 64 stitches. I have 2 more skeins of this in different colorways and I'm thus far pleased with this yarn. These will make good Christmas socks.

Here I am recovering after my Jamieson & Smith Wool Brokers experience! This was our first target upon arriving in Lerwick. We saw it from the walk with our suitcases from the ferry to our guest house. It was high up on a treacherous bluff with a convoluting and Lord of the Rings-esque stone staircase, but the store sign was clearly and brightly labeled. We dumped our bags, got a map and headed clear back out in search of it. Inside I bought the yarn for the Luckenbooth sweater and a lace shawl! I'm going to have to become quite disciplined in my knitting before I take on either of these projects! I also got some drop spindles including an Ashford, Shetland roving, and an Ashford Niddy Noddy.
Wednesday, June 20, 2007
Well, I'm back...
I haven't been around for a while! I just returned home from the long awaited trip back to the UK with my mother. We traveled around in northern England in York and Thirsk. For any of you Iowa Public Television nerds out there, Yorkshire is where the filmed "The Full Monty", "The Last of the Summer Wine", and "All Creatures Great and Small", otherwise known as James Herriot country. We then traveled by train up to Aberdeen, Scotland and took an overnight ferry to The Shetland Islands and stayed in a guest house in Lerwick. There we visited the Jamieson and Smith Wool Brokers and I got glorious yarn for a fairisle sweater that I am so excited about. I don't care if it takes me 20 years to knit it, but I shall attempt it. I also got yarn for a Shetland lace shawl pattern, another knitting Mount Everest! I bought two new drop spindles for myself, as well as one for Melissa and Summer along with 100 grams of real shetland wool roving! (If they catch the spinning bug, we will find them out of wool to spin, out of cotton balls because they tried to spin them, and in fact pulling the hair out of their brushes and trying to spin it! It truly happens!) I got 5 different shades of Shetland roving for myself for spinning. I don't know what I'm going to do with it or in fact what I have enough for. It is unspun and I'd have to kind of have a project in mind and spin for that guage. Hmmmm. I also got myself an Ashford niddy noddy. We also visited the fabulous Shetland Museum which was free of admission and absolutely excellent. While in the Shetland Islands, we were closer to Norway than we were Scotland so it never really got dark there, and if the islands didn't have stone walls, you'd swear you were in southwest Norway. It was just wonderful. We then flew to Edinburgh and toured the castle, Holyrood Palace, shopped along the Royal Mile and Princes Street, visited two period restored houses, and visited The Tartan Weaving Mills. We flew home with our luggage just under the weight restriction weight, but our carry on luggage was quite heavy, hmmmm, go figure. We ended up having to spend an extra night in a hotel because a flight was canceled on the last leg of our trip home, but it all worked out in the end. We had a great time but I am glad to be home.

We visited some beautiful buildings and churches and cathedrals. Saw the Stone of Destiny in Edinburgh. It is hard to believe that all the crowned heads had been crowned above that stone, starting back with William the Conqueror, isn't it? Somebody like that? And to marvel at how those beautiful windows were made how many hundreds of years ago with the tools and technology that they had and they have survived!
Saw a WWII era kitchen and pantry in the James Herriot house, and a Georgian kitchen in Edinburgh. I have a weakness for those kinds of displays! We walked along on top of medieval city walls along the perimeter of the old city. Learned all about Richard III and the mystery of the Princes in the tower.
 And we goofed around and laughed a lot and took stupid pictures of us being stupid. You should see us at Christmas!
Thursday, May 24, 2007

I thought I'd recap my recent activities with some crappy pictures! We had city wide garage sales this last weekend. Since I'm too much of a pack rat to actually get rid of some stuff, I chose instead to embark on an insane baking biathlon. I baked 24 (count them 24) dozen kringlas. UTTER MADNESS!! I mixed up two double batches of kringla dough in my HUGE metal mixing bowl (one double batch at a time!) and then piled them into another big bowl so I could use the huge bowl for lefse. Meanwhile, I had my two biggest pots on the stove boiling 10 pounds of russet potatoes that I would later cool and rice twice. Keep in mind that this was all happening at about 2300 and would continue until 0500 when I would then shower, change clothes, load my car and then DRIVE 40 miles to get home! I was facing the Point Of No Return where I knew what I was in for and now HAD to continue and finish lest I waste all those ingredients, however many POUNDS of it there was! I just stood there for a moment and laughed to myself like a crazy person at how pathetic and ridiculous my situation was at that moment! In the end I sold the first 16 dozen kringla that I made and baked another 8 dozen at my parents' house. I also mixed up the lefse dough (about 72 pieces worth) and cooked it in their kitchen which was actually kind of nice because I think it is a rare treat to eat lefse hot off the griddle. I was also quite proud of myself that I cooked it all by myself which I have never done in all my life. When I was a little girl, I would stand on a chair in front of the stove with the lefse stick and Mother would roll it out and I would flip. Now that I am older and Mother is just OLD ;) we have switched jobs, but Mom was working that morning so I rolled and flipped myself. It CAN be done if you're not babysitting or watching anything else in the kitchen. You are steadily busy and I always get a sore lower back after rolling/stooping for 3 hours.
Lately for some reason, I've felt the need to do some fabric de-stashing. I've had this lovely blue and white lithograph fabric (about 12 yards of it--MUST HOARD!). I was going to be home where there is a great open space to work on blankies and where Mom's Elna sewing machine is! I backed it with some navy broadcloth and machine quilted it 6 inches apart in lengthwise running stitches. It turned out to be a nice light spring blanket. I am pleased. I was hoping to have some scraps of batting to use for Mari bases...

Did someone say Mari? Normally I would say this is a crappy blurred picture, but it is actually an accurate picture of what my eyeballs were capable of seeing at the time. DeeDee and I worked for almost 8 hours on Temari balls twice this week, pausing only for fluids and PRN bathroom breaks. My mother had some batting leftovers that were too small to use for anything but too big that you wanted to throw them out, so we even did some recycling while we were at it. DeeDee made all from scratch temari this time! She picked her own noisemakers and had a charming idea about putting personalized tokens or charms inside!
Sunday, May 13, 2007
 This last Thursday was the monthly meeting of the area spinners and weavers. We met at the MacNider Museum (on the LAWN and I was already internally whining about the heat) and one member had her floor loom set up for an overshot weaving demonstration. I stopped in to see my beloved puppets before I left.

I hit the library before I went home. No new or exciting knitting books. And shame on me, but I saw this growing in the lawn of the library and couldn't help but swipe it! I absolutely LOVE Lillies of the Valley! This tiny little stalk was so delicately fragrant!
When I was little, my mother used to play the piano and we'd sing all kinds of songs. We learned a lot of Norwegian songs and hymns growing up. We had piano music for The Sound Of Music and Hans Christian Andersen and Sunday School songs. One of my mother's favorites was 'White Choral Bells'. "White choral bells upon a slender stalk, lillies of the valley deck my garden walk. Oh don't you wish that you could hear them ring? That will only happen when the fairies sing." HAPPY MOTHER'S DAY, MOM!
Saturday, May 05, 2007
Tartan Temari


We forced Melissa to come to Temari night last night! She and her husband were in charge of the catering (Hardees and Wendy's! Num Num!) and once we'd each had sustenance, we began work on a new Temari. She wrapped her ball in black sewing thread and learned how to measure her ball and plot her lines. This ball is only divided into 4ths so you can really see the thread 'ribbons' against the black. She has also gone through the idea books and has found a few stitched patterns that she likes so we will try those next time. I do know one thing though, soon we'll have to get together to have just a Mari dummy making party because I'm quickly running out of finished bases!
 Here is the Temari I finished last night. It is wrapped in a chocolate brown sewing thread, and then I divided it into 4ths to show Melissa how to do hers. I chose some really bland yet stunning martha blues and greens and then did a simple wrapped design but did one strand of color at a time for a woven look. I think it looks more like a plaid Temari though! Oh well. I am going to lie down for one hour and then go to Hobby Lobby to see what their metallic thread and perle cotton inventory has to offer!
Thursday, May 03, 2007

I finished a pair of socks this week too. This is some lovely variegated 100% wool yarn I got at Joann Fabrics of all places! I made them with 3 skeins but of course I bought 4, as well as 4 of a blue/grey colorway. Oh well. I'm sure I can use the leftovers for something. It is a lovely 2 ply of irregular thick and thin singles. It looks very homespun while it knits up and was just a pleasure to work with! These were knit ankle down (cuff 48 stitches) on size US 6 double pointed needles.
These are lovely TV/bed socks and will be cozy and warm...but did I mention that I turned my air on once already this week? I'm going to have to put these away for a few months before I'll get to enjoy them!
These are lovely TV/bed socks and will be cozy and warm...but did I mention that I turned my air on once already this week? I'm going to have to put these away for a few months before I'll get to enjoy them!
Temari Action Shots!

Here is the wrapped and marked ball. That is a styrofoam ball that I hollowed out slightly, put a jingle bell inside, wrapped in quilt batting, wrapped with yarn, and then DeeDee wrapped it with an entire spool of sewing thread. She has measured and plotted north and south poles, measured and divided the ball into thirds, and wrapped and anchored an equator and longitude lines. She is ready to begin the design work, but it looks as if she's still thinking about the colors....

Here she has begun anchoring her colored perle cotton threads that she will wind around the ball in her chosen design. Note the position of her right thumb and forefinger. Your hands get SO tired from gripping and pulling the needles! I have some awesome 4 inch needles that are great for going through the entire thickness of the ball and I have some INDISPENSIBLE little needle grippers! They're the size of a 50c piece and are to needles what those rubber kitchen grippy things are to pickle jars! They are a must for this kind of work!

Here you can see quite a few rows of the work in progress. The nice thing about a wrapped ball is that you don't have to cut your thread as you work the design. You anchor the end of the thread and just wind directly off the skein so the work goes quite quickly. Again, note the position of her fingers! Your hands are sore the next day from gripping the thread and holding the work tight!

Here she is anchoring a color she is finished with. Note the gynormous needle.

And here is the finished object!
Here is a nice little Temari tutorial to give you a better idea of what we're so nuts about making!
 Such a wondrous and colorful gathering of perle cotton, styrofoam balls, and sewing thread can only mean ONE thing: Temari balls! DeeDee has been asking and asking to start a Temari ball. I had a few yarn wrapped Temari balls ready for decoration and we just started there. First we had to agonize over the COLORS which is always the worst part. She then wound her chosen spool of sewing thread onto the base and got some practice anchoring her thread and learning how her stitches would behave. We used a paper strip to make her measurements and divisions on the ball as well as establishing her two poles.
That is where we picked up this week. She learned how to stitch her latitude and longitude lines and made further measurements to mark the wrapping. She agreed that the measuring/marking was the most tedious and frustrating part. We began wrapping with the perle cotton and the metallics and she was off! I watched her start the first few rows and then she worked on her own! We also just started doing actual embroidery stitching on a ball. She has 2 more that are marked with the stitching already begun and she recently took her final and was excited to have time to work on these!

This is the Temari I finished that night. It is wrapped in a spool of martha blue thread that I have been dying to use on a ball. This ball was divided into fourths and stitched with two woven spindle shapes. It has a wide obi belt so you can't see where my spindles overlapped a bit! I have had SO much fun showing someone else how to make these! The two we have made so far are the simplest to make but you can still see how beautiful even the simplest ones are. I need to be making these for my nieces, but I think I want to keep these! I look forward to revisiting different techniques as DeeDee learns, and I'm excited about learning the more complex ones!
DeeDee's WIP is a deep purple divided into eighths and will be 8 single spindles in shades of purple and rust--and the first one looked SO good! I can't wait to see it when she is finished!
Subscribe to:
Posts (Atom)