I sent the link to Brenda and she was all for it. The project requires 45" of a cotton calico print and three 45" cuts of flannel. Luckily Joann's was having flannels on sale last week so Brenda and I both cleaned up in our respective Joann's. The flannels are chosen for the color and not the print because only edges of the flannels are seen once the project is finished. I already know my mother would disapprove my choice of colors but I just love pukey greens!
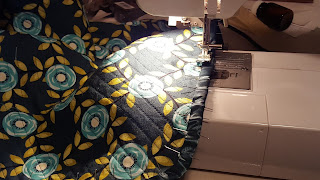
Like I said, I couldn't wait to start this project. I wanted to test run it too so I'd know what to expect if we tackled it as a group. I am SO going to make many more of these. You find the diagonal/hypotenuse of the fabric using a strand of yarn. Then you stitch your layers of fabric together on this line along with thousands of other parallel lines stitched 1/2" away from this central line. I always think everything is going to take just 10 minutes but I labored an entire afternoon stitching all those channels.
Here is the blanket all stitched and I think those simple lines look quite stunning!
Now for the cutting! Dave quite pleasantly surprised me by going out and finding this tool and buying it for me for Christmas. I'd hunted in Joann's, Michaels and Hobby Lobby and they didn't have it. He ultimately found it in Hancock Fabrics. I was impressed with his initiative.This is the most ingenious little tool. It is basically a rotary cutter combined with letter opener technology. There are 4 different sized "feet" that you slide into your stitched channels depending on their width. You could cut every single channel with a pair of scissors (I cut the smallest edge channels this way) but you have to be really careful not to cut through the cotton print. This tool makes it effortless and mindless and ensures the cut is centered in the channel.
I used the 1/2" foot for my channels and it was slick.
Here it is all cut and waiting to be bound. This is how I left it when I stopped to get ready for work yesterday. I'd been thinking about it non stop until tonight when I got home to finish it. I just love the look and feel of those cut channels. It is quite sturdy too. For some reason I thought the blanket would be quite flimsy once cut. I did spend the money for a sturdy and supple cotton print which clearly made a difference. You wouldn't want to use a gauze-y or cheap fabric for the base.
I originally bought 2 packages of satin blanket binding and was just going to do a mitered corner full on blankie binding. I was thinking about this all day at work and instead decided to try for a narrower binding like the tutorial. Plus I really liked the idea of curved corners. I was too nervous to pin and stitch a folded binding to such a thick and textured blanket. It is tricky enough trying to control one binding edge let alone two. I thought I'd practice on some leftover binding in the stash and decided I liked that color better than what I'd purchased. And since you cut it in half, I had more than enough to finish my project.
I pressed under 1/4" and then stitched the un-ironed edge right side down to the flannel side of the blanket edge. Please excuse my skanky ironing board.
Then I folded the binding over to the other edge of the blankie, pinned it to death and then top stitched the pressed edge to finish the blankie.
Ta-DA!!! Here it is fresh from the dryer. The flannel strips have frayed and turned into chenille just like it's supposed to. My favorite thing! Melissa and Brenda and I always call this moment "the reveal" because it has done it's own magic. The colors look absolutely terrible in this light but it is 0032 at the moment. Most of my best sewing/knitting/crafting happens in the wee hours of the night. I texted a picture to Brenda too. She still works nights and some of our best conversations took place in the wee hours of the night when we were at work together or on the phone on a night off!


No comments:
Post a Comment